
Webflow Integration
A surprisingly easy and powerful tutorial on how to integrate Unlock into Webflow and monetize your content.
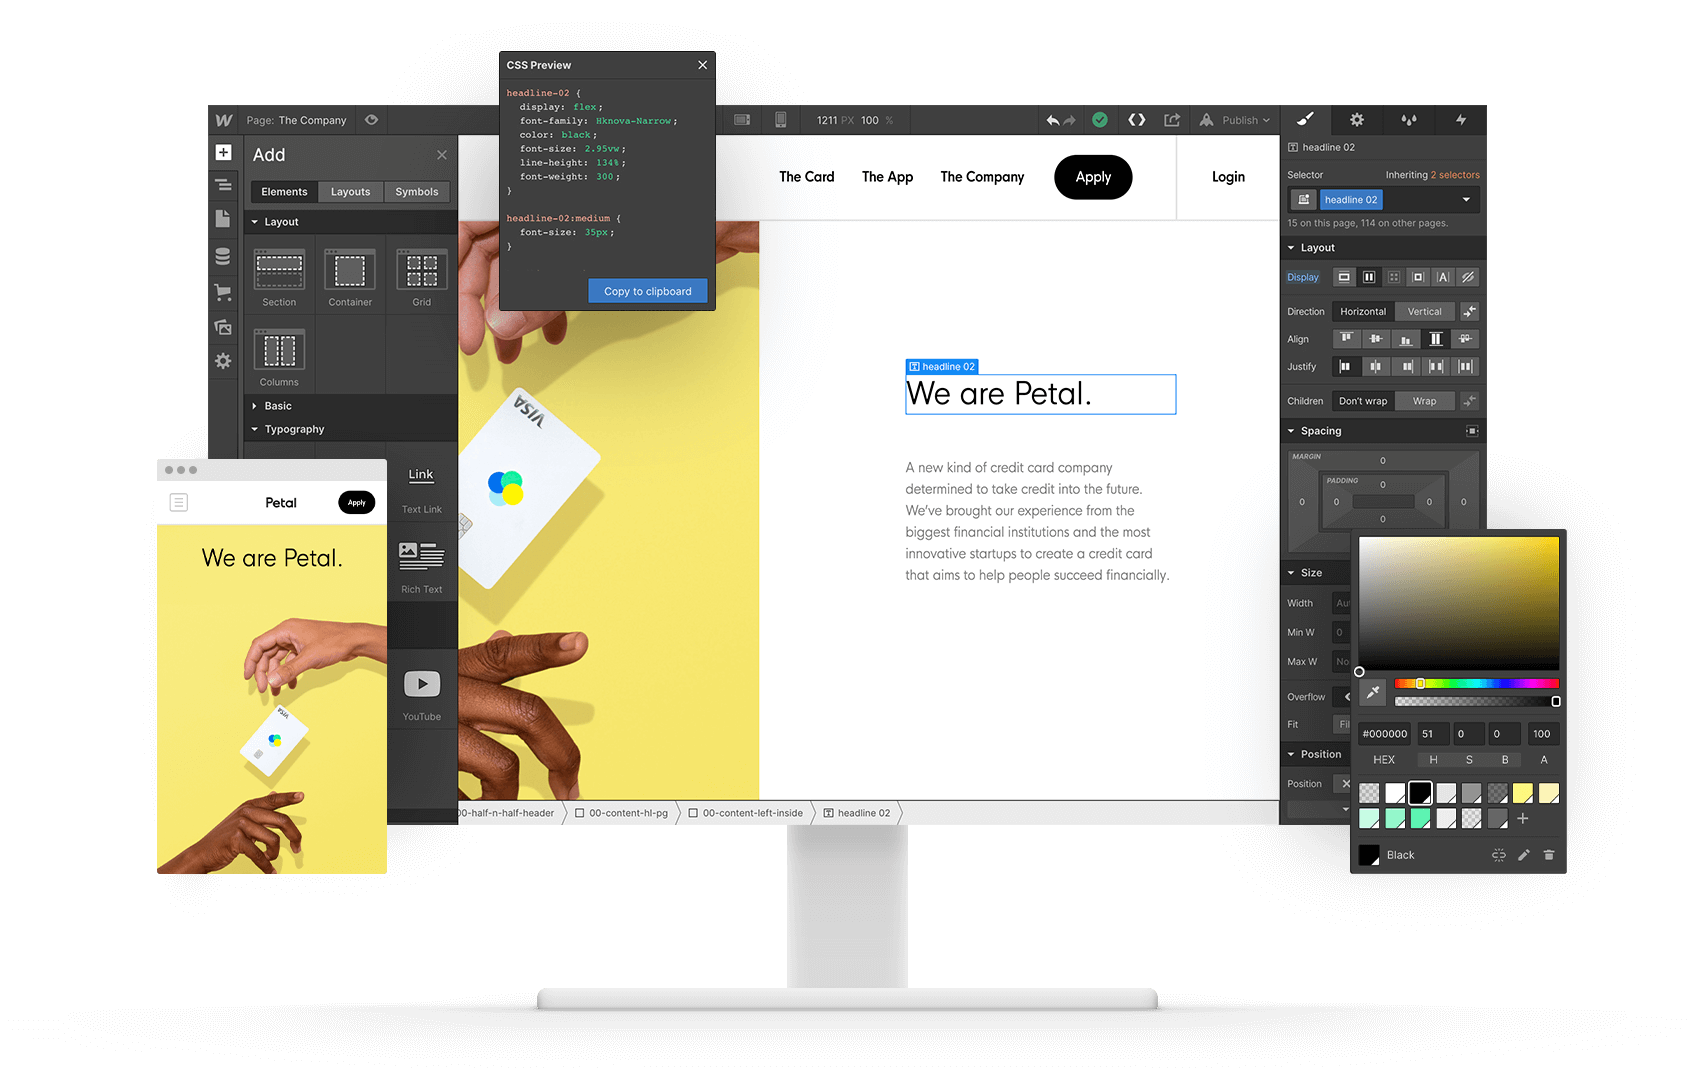
As a designer I love Webflow. It combines powerful design tools with no hassle CSS, responsive layouts and great cross-browser compatibility. All this lets the technical aspects fade into the background and lets me focus on the design and the user experience. On top of that it also offers a huge amount of flexibility and custom integrations.
When I looked into integrating Unlock I had a feeling it would be possible but I got super excited when I realized how easy it was. Integrations like these take Webflow from a basic web creation tool towards a much more robust no code and web app platform. It's really awesome to see how you can integrate a decentralized and permissionless membership on top of your website.
One thing you'll need for the configuration is a lock that you can create on the Unlock dashboard -- it's very straightforward. For more info check out this article in our Guides. The integration process is straightforward: You start with embedding Unlock's paywall, configuration, event handler and trigger scripts and then adding a few lines of css to control the visibility. All of this is copy and pasting, and shouldn't take longer than 5 to 10 minutes. The final step is to add specific selectors/classes to your elements. Check out the demo and more detailed instructions below and on the integration site. You can also clone the project from the showcase page.
It starts to get really interesting when you start using it with dynamic and CMS content -- check out the blog example for that.
Because Unlock is open-source and a protocol the options and opportunities are endless depending on how simple or complex you want to keep things on your end (and your dev skills 😉). Integrating Unlock or want to build something awesome? Let us know! We also have a grant program for Unlock integrations and great use cases.
How To
There are 3 parts to integrating the Unlock Paywall App
- The Content
- Checkout Initiation
- Paywall Integration: Script, Config, Handler, CSS
1. The Content
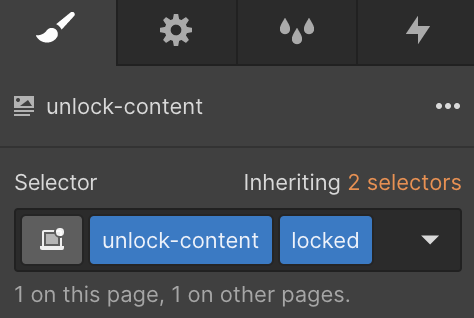
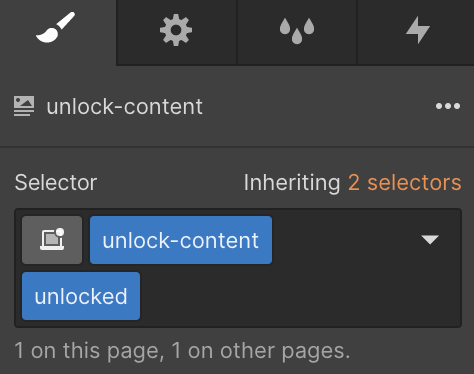
Unlock uses three classes in the selector panel to define content
unlock-content, unlocked, locked.
The way Unlock works is it checks for the unlock-content and then hides the content blocks that have theunlocked class and shows the ones with thelocked class.
What you'll have to do is create two version of the content – one thats unlocked and visible to non members and a one thats locked and only visible to members.
Let's look at two examples, one using native webflow elements the other using an embed element.
Public Element
This section is visible when the content is locked, hence it has the locked class set.
Private Element
This is for members only and needs to be unlocked, hence it has the unlocked class set
2. Checkout Initiation
The link and button that bring up the Unlock paywall are also special and they both embed elements with custom code.
Button
<button
  class="unlock-content locked"
  onclick="window.unlockProtocol && window.unlockProtocol.loadCheckoutModal()"
>
  Unlock!
</button>
Link
<a
  class="link"
  onclick="window.unlockProtocol && window.unlockProtocol.loadCheckoutModal()"
>
  Become a member
</a>
to read and submit comments.
3. Paywall Integration
You need to add the Paywall Script, Paywall Configuration, Event Handler and Unlock CSS to the Head Code in the Custom Code section of your site which you can access from the head section of your website. You can find all of the code that needs to go into the head here.
Paywall Script
<!-- Unlock Paywall Application Script -->
<script>
  (function(d, s) {
    var js = d.createElement(s),
      sc = d.getElementsByTagName(s)[0];
    js.src = "https://paywall.unlock-protocol.com/unlock.latest.min.js";
    sc.parentNode.insertBefore(js, sc);
  }(document, "script"));
</script>
Paywall Configuration
<!-- Unlock Paywall Application Configuration -->
<script>
  var unlockProtocolConfig = {
    network: "100", // Network ID (1 is for mainnet, 5 for goerli, 100 for Gnosis chain... etc)
    locks: {
        "0xef6389F33ac557405C961030Efcc3b1CE3e6bc17": {
          "name": "Webflow Integration"
        }
      },
    icon: "https://uploads-ssl.webflow.com/607ded735b3ba1e212f1c708/607f1f8d698e5aceeb6c98a9_Unlock-WordMark.png",
      "callToAction": {
        "default": "Please unlock this demo!"
      }
	}
</script>
Events Handling
<!-- Unlock Event Handler -->
<script>
window.addEventListener('unlockProtocol.status', function(event) {
  // We hide all .unlock-content elements
  document.querySelectorAll('.unlock-content').forEach((element) => {
    element.style.display = "none"
  })
  // We show only the relevant element
  document.querySelectorAll(`.unlock-content.${event.detail.state}`).forEach((element) => {
  	element.style.display = "block"
  })
})

window.addEventListener('unlockProtocol.authenticated', function(event) {
	// event.detail.addresss includes the address of the current user, when known
})

window.addEventListener('unlockProtocol.transactionSent', function(event) {
	// event.detail.hash includes the hash of the transaction sent
})
<script>
CSS
<!-- Styling the Unlock content to be initially hidden till the handler loads to prevent flickering -->
<style>
  .unlock-content {
    display: none;
  }
  .unlock-content .locked {
    display: none;
  }
  .unlock-content .unlocked {
    display: none;
  }
</style>
Done
Want to play around with the code? You can clone the project from the showcase page or experiment in this JSFiddle.